

Mar 12th 2025
Battle Belt Setup Guide
What to Carry and Where to Place It
A good battle belt setup is not measured by how much gear it carries. It is measured by whether the right equipment stays secure, accessible, and out of the way when you move, draw, reload, work around vehicles, or reach medical gear.
Whether you call it a battle belt, gun belt, duty belt, range belt, war belt, or tactical belt, the basic purpose is similar: provide a stable platform for carrying essential equipment at the waist.
The exact setup should be driven by the job. A range belt does not need the same equipment as a law enforcement duty belt. A general-purpose battle belt does not need the same capabilities as a system used around aircraft, elevated terrain, or specialized professional environments.
Start with the mission. Add the essential equipment. Test everything together. Anything added after that should earn its place.
What Should Be on a Battle Belt?
Most battle belt setups start with:
- A stable belt platform
- A secure holster
- Pistol magazine pouches
- One or more rifle magazine pouches, if required
- A trauma kit or IFAK
- An accessible tourniquet
- A dump pouch, if it supports the job
- Mission-specific equipment only when required
For many range and training setups, that is enough. Professional users may also need restraints, a utility light, marking tools, communications equipment, or a general-purpose pouch. The best battle belt setup is not the one carrying the most gear. It is the one that keeps essential equipment accessible without adding unnecessary weight, bulk, or interference.
What Is a Battle Belt?
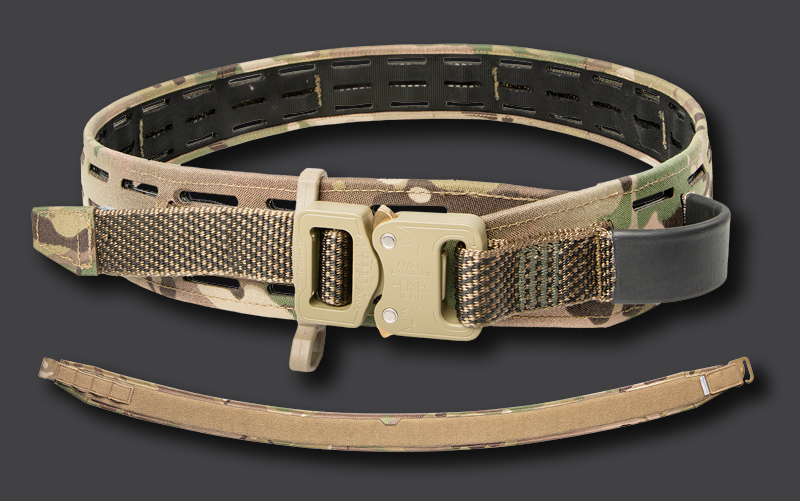
A battle belt is a load-bearing belt designed to carry equipment such as a holster, magazines, medical gear, and utility pouches.
Unlike a normal trouser belt, a battle belt is built to support additional weight without folding, sagging, or allowing mounted equipment to move excessively. Many modern battle belts use a two-piece design consisting of an inner belt worn through the trouser loops and an outer belt that carries the equipment.
A battle belt can be used by itself or worn with a plate carrier, chest rig, or other load-carriage system. Its role is to keep frequently used equipment close at hand while reserving space on the torso for armor, ammunition, communications gear, hydration, or other mission equipment.
Battle Belt vs. Gun Belt vs. Duty Belt
These terms are often used interchangeably, but there are practical differences.
Battle Belt
A battle belt is generally a modular load-bearing system used for training, military applications, tactical work, or other situations where the user needs immediate access to a holster, magazines, medical equipment, and supporting gear.
Modern battle belts are commonly worn as an external system over an inner belt. This allows the complete setup to be staged and put on without routing every pouch through the trouser belt loops.
Gun Belt
"Gun belt" is a broad term. It may describe anything from a reinforced everyday belt supporting a concealed holster to a fully equipped external belt carrying magazines, medical equipment, and other gear.
The name alone does not define the belt’s load capacity, construction, or intended use.
Duty Belt
A duty belt is normally associated with law enforcement, corrections, security, or other uniformed professional work.
In addition to a holster and magazines, a duty belt may carry handcuffs, a radio, flashlight, medical gear, less-lethal equipment, and other agency-required tools. Duty-belt configurations should follow agency policy, applicable standards, and approved training.
Range Belt
A range belt is usually a lighter configuration built around the equipment required for a training class, competition, or range session.
A typical range belt may include a holster, pistol and rifle magazine pouches, a compact trauma kit, a tourniquet, and an optional dump pouch.
Tactical Belt
"Tactical belt" can refer to a reinforced everyday belt or a modular external equipment belt. Because the term is used so broadly, the belt’s construction and intended use matter more than the name applied to it.
Choose a belt based on the load it must carry, how quickly it must be put on, what other equipment it must work with, and the environment in which it will be used.
External Battle Belt vs. Integrated Belt System
One of the first decisions is whether the equipment should remain on a separate external belt or be mounted directly to the belt holding up the pants.
External Battle Belt System
An external belt can be staged with the holster, magazines, medical equipment, and supporting pouches already mounted. The complete system can then be put on without rebuilding the loadout each time.
In the accompanying video, Chuck Pressburg compares this approach to firefighter turnout gear. Firefighters may wear normal station clothing while their protective equipment remains staged and ready. An external battle belt works on the same basic principle: it separates equipment load carriage from everyday clothing and allows the user to kit up when needed.
An external belt system makes sense when:
- The belt needs to be put on or removed quickly
- Work clothing differs from everyday clothing
- The equipment does not need to be carried all day
- The same setup will be used over different uniforms or clothing layers
- Consistent equipment placement is important
- The belt will be staged between periods of use
Integrated Belt System
An integrated setup mounts equipment directly to a stiff trouser or rigger-style belt. This may reduce bulk and eliminate a separate outer belt, but routing equipment through the trouser belt loops normally takes longer.
An integrated belt may make sense when:
- The user is dressing specifically for the job
- The equipment will remain on throughout the work period
- A lower-profile setup is preferred
- The equipment load is relatively light
- Rapid donning and removal are not priorities
Neither system is automatically better. The right choice depends on how the belt will be worn, how much equipment it must carry, and how quickly it needs to become operational.
Jared Reston's Battle Belt Setup
In this video, Chris Sizelove and Jared Reston deep dive Jared’s CHLK® Belt setup and discuss why he chose the gear that he did. Chris and Jared both carried gear on their belts professionally and talk about how they’ve modified their setup for range use. For the most part, Jared’s range belt is a minimalist setup, and we’ve highlighted a few of his choices below:
- A Blue Force Gear Holster Hanger with a Safariland 6390RDS holster featuring QLS mount. Chris calls the ability to remove a holstered gun from the belt a “non-negotiable” and discusses why in the video.
- A BFG MARCO® Dispenser on a BFG Hanger – the MARCO® is used for marking people, places, and things with small chem lights.
- A Double pistol mag pouch and a single rifle mag pouch on Ridgeline Defense hangers.
- A BFG Micro Trauma Kit NOW!® with a tourniquet and trauma shears mounted on the pouch using the BFG Shear Hammock®.
- Jared’s belt choice is the BFG CHLK® Belt which is an inner/outer belt combination featuring a contoured design.
Rather than overloading his belt with pouches, Jared has distilled his setup to only what is truly necessary. He and Chris agree that now that they don’t need their gear for duty use, they prioritize functionality over fitting as much on their kit as possible. As Jared puts it, his belt doesn't feature unnecessary pouches "to make it look awesome for Instagram."
Check out the full video to learn more of Jared’s “why” behind his belt set up. And last week we discussed Jared’s near fatal incident when he encountered a suspect that shot him multiple times.
Jared is a seasoned law enforcement veteran with over 20 years of service at Jacksonville Sheriff's Office. Since retiring in 2020, he now travels the nation teaching firearms and tactics to prepared citizens, military personnel, and law enforcement agencies. For more information on Jared or to take a training course from him, visit his website.
Chris Sizelove’s Battle Belt setup was featured along with Chuck Pressburg’s in this article released a few months ago. Chris Sizelove is a retired Master Sergeant who had a distinguished career in the U.S. Army. Joining in 1999, he served in various capacities in the elite 75th Ranger Regiment spanning across the 2nd, 3rd, and 1st Battalions. His extensive service includes roles as a Pre-Ranger Instructor and a pivotal participant in forming the Regimental Special Troops Battalion (RSTB). Sizelove also held the elite position of Master Breacher of the Regiment and later transitioned to roles in the Defense Intelligence Agency.
Which Battle Belt Setup Is Right for You?
Range and Training
Begin with:
- Holster
- Pistol magazines
- Rifle magazine, if required
- Compact trauma kit
- Tourniquet
- Optional dump pouch
The priority is a consistent draw, reliable reloads, basic medical capability, and enough mobility for extended training.
Law Enforcement or Duty Use
Begin with:
- Approved duty holster
- Required pistol and rifle magazines
- Trauma kit
- Tourniquet
- Restraints
- Utility light
- Communications equipment
- Agency-required tools
Professional duty equipment should be configured according to agency policy, training, and applicable standards.
How to Set Up a Battle Belt
1. Define the Mission
Before mounting a pouch, decide what the belt must support.
Ask:
- Is the belt for range training, duty use, or field work?
- Will it be worn with a plate carrier or chest rig?
- Will the user spend significant time in a vehicle?
- Does the complete setup need to be put on quickly?
- What equipment must remain immediately accessible?
- Does the job require restraints, marking tools, communications equipment, or expanded medical capability?
- Are there specialized equipment, policy, or certification requirements?
The mission should determine the equipment. Available MOLLE space should not.
2. Mount the Holster
The holster normally sits on the strong side. Its position should support a consistent draw without interfering with armor, pouches, or normal movement. The Blue Force Gear® Holster Adapter is designed to maintain consistent holster placement on GRID® and CHLK® belts rather than allowing the holster to slide forward or backward.
After mounting the holster, test the draw while standing, kneeling, sitting, and wearing the rest of the intended equipment. The holster and mounting system should always be selected and used according to the manufacturer’s instructions, organizational policy, and applicable training.
3. Position the Magazine Pouches
Pistol and rifle magazine pouches are commonly placed on the support side so they can be accessed without reaching across the body. Position the pouches where the magazines can be reached naturally without interfering with:
- The holster
- Plate carrier or chest rig
- Sling movement
- Sitting and kneeling
- Vehicle entry and exit
- Medical equipment
- Other pouches
The Stackable Ten-Speed M4 Mag Pouch provides a low-profile option for carrying M4 magazines and similarly sized items. For users who prefer a structured pouch with active retention, the Mag NOW! line provides another option for pistol and rifle magazines.
Pouch orientation will vary based on the user, equipment, and training. The correct orientation is the one that supports a consistent reload without forcing an awkward reach or interfering with the rest of the system.
4. Add a Trauma Kit or IFAK
Medical gear should be treated as core equipment, not as whatever fits after the rest of the belt is assembled. Chuck’s range belt uses a Micro Trauma Kit NOW!® with a Shear Hammock®. The horizontal footprint keeps the medical equipment compact while maintaining access to the tourniquet and trauma shears.
Users who need a smaller footprint can consider the Micro Trauma Kit NOW!® – NANO. Users requiring greater capacity may consider the Micro Trauma Kit NOW!® – PLUS or Trauma Kit NOW!® – SMALL.
Kit size should be selected according to:
- Required medical capability
- Available belt space
- User training
- Equipment carried elsewhere
- Mission and organizational requirements
The kit must remain accessible. If it cannot be reached while wearing armor, sitting in a vehicle, or working around other equipment, the placement should be reconsidered. For more information about the available sizes, see the Blue Force Gear® trauma kit comparison.
5. Stage the Tourniquet
A tourniquet should be secure, protected from unnecessary exposure, and readily accessible. It may be mounted on or near the medical kit or staged separately on the belt. Regardless of its location, it should not be buried behind other equipment or positioned where armor, a vehicle seat, or another pouch prevents access.
Medical equipment should be selected, staged, and used according to approved medical training and organizational requirements.
6. Decide Whether You Need a Dump Pouch
A dump pouch can provide temporary storage for:
- Magazines
- Range equipment
- Gloves
- Evidence
- Loose mission equipment
- Other items that need to be secured temporarily
A dump pouch is useful, but it is not mandatory. It should solve a defined problem rather than become a place to accumulate unnecessary gear. The Blue Force Gear® Medium Dump Pouch provides temporary storage while maintaining a compact footprint when not in use.
For additional considerations, see the BFG® dump pouch guide.
7. Add Mission-Specific Equipment Last
Once the holster, magazines, trauma kit, and tourniquet are correctly positioned, add only the equipment required for the job.
Possible additions include:
- Utility light
- Multitool
- Gloves
- Optic adjustment tools
- Marking equipment
- Restraints
- Communications support
- General-purpose pouch
- Notebook or administrative materials
Law enforcement users may add a Handcuff Pouch. Some professional users may carry a MARCO for marking purposes. A Low Profile General Purpose Pouch can support smaller utility or administrative items.
Every addition should answer one question:
Does this item need to be reached quickly enough to justify carrying it on the belt?
If the answer is no, the item may belong in a pocket, pack, vehicle, plate carrier, or another equipment layer.
Common Battle Belt Setup Mistakes
Carrying Too Much
Empty MOLLE does not need to be filled. Every additional pouch adds weight, bulk, and another possible interference point. If an item does not need to be accessed quickly, it may belong somewhere else.
Blocking the Holster
Nothing should crowd the holster, interfere with the grip, restrict a retention device, or change the draw path.
Making Medical Gear Inaccessible
A trauma kit is not properly positioned if the user cannot reach it. Test access while wearing the complete loadout rather than evaluating the pouch only while standing without armor.
Ignoring Armor and Vehicle Compatibility
A belt that works by itself may interfere with a plate carrier, chest rig, sling, vehicle seat, or other equipment.
Test everything together in the environment where it will be used.
Placing Hard Equipment Over the Spine
Avoid placing hard or bulky equipment directly over the spine, particularly when the user will be sitting, riding in vehicles, or working around structures and barriers.
Copying Someone Else’s Belt Exactly
An experienced user’s belt can provide ideas, but it reflects that person’s job, body type, equipment, and training. Copy the principles, not necessarily the placement.
Failing to Train With the Setup
A belt is not finished when the last pouch is mounted. It must be tested until the user knows where each item is, how it interacts with the rest of the loadout, and what needs to change.
How to Test a Battle Belt
Test the complete setup while:
- Standing
- Kneeling
- Sitting
- Moving
- Entering and exiting a vehicle
- Wearing intended armor or load carriage
- Using the intended sling
- Accessing magazines
- Accessing medical equipment
- Reaching mission-specific tools
Evaluate the entire system:
- Does the belt sag, shift, or twist?
- Does the holster remain in a consistent position?
- Can the magazines be reached naturally?
- Can the medical kit and tourniquet be accessed?
- Does any pouch interfere with armor, the sling, or movement?
- Can the user sit, kneel, and move normally?
- Is any equipment being carried simply because space was available?
The final setup should feel predictable. Essential equipment should remain where the user expects it without requiring unnecessary movement or adjustment.
Battle Belt Setup FAQs
What is the best battle belt setup?
The best setup is the one that matches the mission and the user. For many people, the correct starting point is a stable belt platform, holster, pistol and rifle magazine pouches, a trauma kit, and a tourniquet. Add a dump pouch, restraints, light, communications equipment, and utility gear only when the job requires them.
What should go on a battle belt first?
Begin with the holster, magazine pouches, medical kit, and tourniquet. Test those core components before adding optional equipment. This prevents useful belt space from being consumed by lower-priority items.
Where should magazine pouches go on a battle belt?
Magazine pouches are commonly placed on the support side so they can be reached naturally during reloads. Their exact position and orientation should be based on the user’s handedness, body type, armor, sling, training, and other equipment.
Where should the medical kit go?
Place the medical kit where it remains secure and accessible. Rear and rear-side placement are common, but the correct position depends on the user’s mobility, armor, vehicle use, and ability to reach the kit. Medical-equipment selection and use should follow approved training.
Should a tourniquet be carried on a battle belt?
A tourniquet is commonly included on range, duty, and professional belt setups. It should be securely staged and accessible rather than buried behind other equipment. Tourniquet selection and use should follow current approved medical training and organizational requirements.
Should a battle belt work with a plate carrier?
Yes. A battle belt should be tested with the plate carrier or chest rig it will actually be worn with. Pouch placement may need to change to prevent interference with the cummerbund, armor, sling, or torso-mounted equipment.
Do I need a dump pouch?
Not necessarily. A dump pouch is useful when the user needs temporary storage for magazines, gloves, evidence, or other loose equipment. If it does not support a defined requirement, it can be left off.
How do I keep a battle belt from getting too heavy?
Start with essential equipment and remove anything that does not require immediate access. Equipment used less frequently may belong on a plate carrier, in a pocket, in a pack, or in a vehicle. Keeping the belt focused helps preserve mobility and reduces fatigue.
Can the same belt be used for range and duty?
The same belt platform may support both uses, but the final setup should still reflect the job. A range configuration may be lighter and focused on drawing, reloads, and medical readiness. A duty configuration may require additional medical, restraint, communications, or utility equipment.
Is a two-piece battle belt better?
A two-piece belt can provide stable equipment placement and allow the outer belt to be removed while the inner belt remains in the trouser loops. Whether it is the better choice depends on the required load, clothing, speed of donning, and how the system will be used.
How tight should a battle belt be?
The belt should be adjusted according to the manufacturer’s instructions so it remains stable without unnecessarily restricting movement or creating discomfort. Test the fit with the equipment, clothing, armor, and other layers that will actually be worn.
Build the Belt Around the Mission
A battle belt should make the user more efficient, not more burdened. Start with the mission. Choose the correct belt platform. Mount the core equipment. Test the complete system with everything else it will be worn with. Add gear only when it earns its place.
The goal is not a belt that looks complete.
The goal is a belt that works.
About Chris Sizelove
Chris Sizelove is a retired Master Sergeant who had a distinguished career in the U.S. Army. Joining in 1999, he served in various capacities in the elite 75th Ranger Regiment spanning across the 2nd, 3rd, and 1st Battalions. His extensive service includes roles as a Pre-Ranger Instructor and a pivotal participant in forming the Regimental Special Troops Battalion (RSTB). Sizelove also held the elite position of Master Breacher of the Regiment and later transitioned to roles in the Defense Intelligence Agency.